Hello everyone!
For this week Heartfelt Creations inspiration I design 5"x 7" tent card
with
with
Wild Aster Collection


Instructions:
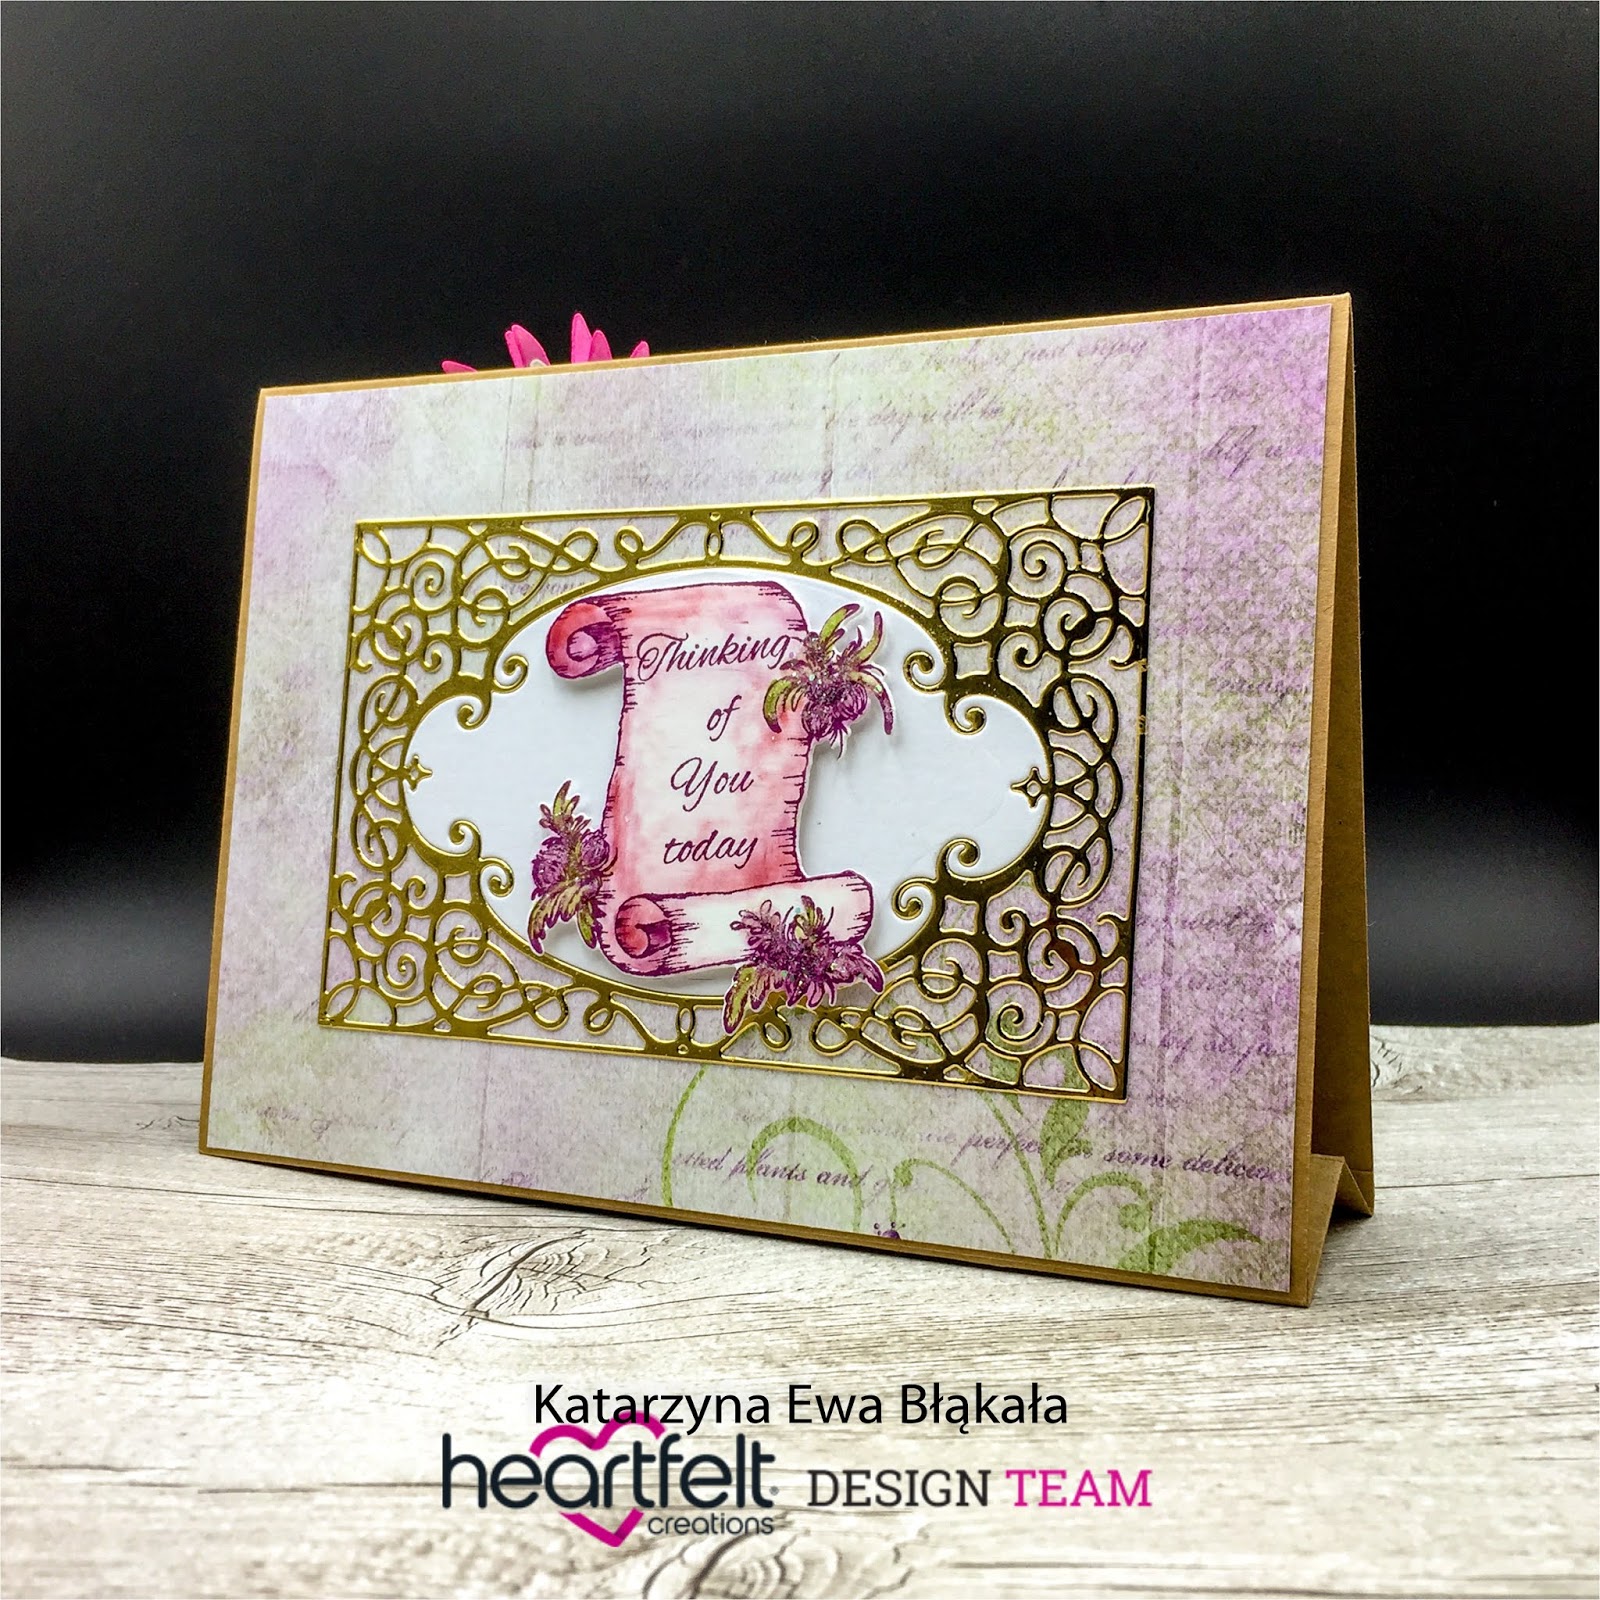
Tent
card measures - 5 inches by 7 inches. To create 5” x 7” card base - cut
out a 10” x 7” piece of craft cardstock and score it at 5” (long side
up), then cut out 2 1/2” x 7” piece of craft cardstock and score it at
1/4”, 1 1/4” and 2 1/4” (short side up). Fold using bone folder along
the score lines. Adhere both parts together as shown to create tent card
base. Cut out two 4 7/8” x 6 7/8” pieces of pattern paper from Wild
Aster Collection and adhere it to the card front and back as shown. Die
cut a frame of Luxe Gold Cardstock with Intricate Swirl Frames Die and
adhere additional layer of white cardstock to the back, then adhere
final piece to the card front using Darice Adhesive Foam Strips. Die cut
two intricate frames one of white and second of Luxe Gold Cardstock.
Adhere the white intricate frame on the card front and gold Intricate
frame on the card back, then fill in the gold intricate frame with white
die cut piece.
Stamp the scroll image of Wild Aster Scroll & Cluster Cling Stamp
Set with Seedless Preserves Distress Ink and colour with Ranger
Distress Inks - Barn Door, Peeled Paint and Seedless Preserves using
Blender Marker and Daubers. Die cut the scroll with matching die of Wild
Aster Scroll & Cluster Die, then adhere additional layer of white
cardstock to the back and distress the edges with Seedless Preserves
Distress Ink. Using metal tip add Designer Dries Clear Adhesive to the
flowers and sprinkle them with Rajni Chawla’s Crystal Clear Glitter and
leave it to dry completely. Adhere final piece to the card back as shown
using 3D Foam Circles.
Stamp the plant image of Wild Aster Spray Cling Stamp Set with both
Seedless Preserves Distress Ink and Peeled Paint Distress Ink. Colour
with Ranger Distress Inks - Barn Door, Peeled Paint and Seedless
Preserves using Blender Marker and Daubers. Die cut the plant with
matching die of Wild Aster Spray Die, then adhere additional layer of
white cardstock to the back. Using a sponge add Designer Dries Clear
Adhesive to the flowers and sprinkle them with Rajni Chawla’s Crystal
Clear Glitter, then leave them to dry completely. Adhere final piece to
the card front as shown.
Stamp flower images of Wild Aster Cling Stamp Set with Vermillion
Ranger Archival Ink and colour them in with Ranger Archival Inks:
Vermillion, Buttercup and Vibrant Fuchsia using Daubers. Die cut the
flowers with matching die of Wild Aster Die, then shape them using
Deluxe Flower Shaping Kit and assemble flowers using a hot glue gun.
Using a sponge add Designer Dries Clear Adhesive to the flower petals
and sprinkle them with Rajni Chawla’s Crystal Clear Glitter. Leave the
flowers to dry completely. Apply Designer Dries Clear Adhesive on the
center of each flower and sprinkle them with Gilt Trip Prills. Leave the
flowers to dry and then adhere them to the card front as shown.
Products Used:
Designer Dries Clear Adhesive, 159723
Tombow Dual Brush Marker N00 Blender, 282873
Metal Tip for Adhesive Bottles, 352854
Gilt Trip Prills, ANC805
Darice Adhesive Foam Strips, D120601
Double Dots 100pc. -3D Foam Circles, DDOTS
Wild Aster Die, HCD1-7257
Wild Aster Spray Die, HCD1-7258
Wild Aster Scroll & Cluster Die, HCD1-7259
Intricate Swirl Frames Die, HCD2-7191
Stack and Store Daubers-Pack of 6, HCDA1-449
Wild Aster Paper Collection, HCDP1-2106
Luxe Gold Cardstock, HCGP1-488
Wild Aster Cling Stamp Set, HCPC-3887
Wild Aster Spray Cling Stamp Set, HCPC-3888
Wild Aster Scroll & Cluster Cling Stamp Set, HCPC-3889
Paper Pack of 10 - Kraft, HCPP1-438-3
Deluxe Flower Shaping Paper Pack of 50 - White, HCPP1-475
Ranger Archival Ink Pad - Vermillion RACP461
Ranger Archival Ink Pad - Vibrant Fuchsia RACP524
Ranger Archival Ink Pad - Buttercup RACP632
Rajni Chawla's Crystal Clear PGM15015
Other Products:
Die Cutting machine, Trimmer or Guillotine, Scoreboard, Scissors, Bone
folder, White cardstock, Ranger Distress Ink pads - Barn Door, Peeled
Paint, Seedless Preserves,
I hope you like my inspiration
For printable instructions to recreate this project visit Heartfelt Creations blog
Check out newest ideas on Heartfelt Creations Official Facebook Page
and
come back for more
Katarzyna Ewa
Comments
Post a Comment